
Chapter 14
14.1 Learning Objectives
By the end of this chapter, you will be able to:
- Architect data pipelines by differentiating between Polling (REST) and Streaming (WebSockets) methodologies.
- Construct a Live Price Ticker that fetches, processes, and displays market data in real-time.
- Mitigate the unique hazards of live trading environments, specifically Latency, Connection Drops, and the complexities of Asynchronous Programming.
- Visualize incoming data dynamically by building a Real-Time Dashboard using matplotlib animation.
- Integrate with professional exchange infrastructure using the CCXT library to stream and analyze live order book data.
14.2 Introduction: The Hard Right Edge
In Chapters 1 through 13, our primary focus was historical analysis. We back-tested strategies against CSV files and databases where the entirety of the timeline was already known. In those controlled environments, we could comfortably peek at the “future” (our test sets) because the events had already transpired.
However, the transition from a historical backtest to a live market is the most critical leap a quantitative professional will make. In the real world, the “Right Edge” of the chart is entirely blank. Market data doesn’t arrive in clean, pre-packaged historical datasets; it arrives sequentially, one unpredictable “tick” at a time.
Deploying an algorithm into live markets without fully grasping the underlying execution mechanics is an invitation to disaster. A strategy with a spectacular Sharpe ratio in a backtest can be completely dismantled by the physical realities of live trading.
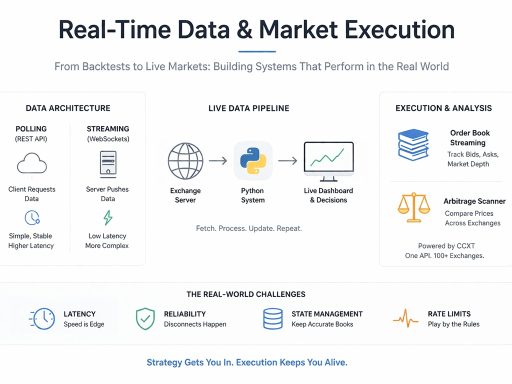
When crossing into live systems, we face three distinct new challenges:
- Latency: Speed is paramount. If your Python code takes a full second to parse data and decide, the arbitrage opportunity or the optimal fill price might have already vanished.
- Reliability: Historical files don’t disconnect. In a live setting, you must architect your code to handle ISP dropouts, exchange server restarts, and API rate limits gracefully.
- State Management: In a backtest, your portfolio balance is easily tracked. Live, you must maintain and dynamically update your local state (cash, open orders, and exact asset exposure) in real-time as asynchronous trades execute.
14.3 Architecture: Polling vs. Streaming
Before writing any code, we must define how our Python script will communicate with the exchange’s servers. There are two primary network architectures used in algorithmic trading, each serving a fundamentally different purpose.
1. Polling (REST APIs) Polling is the “Are we there yet?” method of data retrieval. Your Python script acts as the client, actively sending an HTTP request to the server to ask for the current price. It waits for the response, processes it, sleeps for a defined interval, and then asks again.
- The Mechanics: Every single request carries “overhead.” The script must open a connection, send HTTP headers, wait for the server to process, download the payload, and close the connection.
- Pros: Highly stable and incredibly simple to implement using standard Python libraries like requests.
- Cons: High latency. If a market flash-crash occurs while your script is executing its sleep() function, you are entirely blind to the event until the script wakes up.
- Use Case: Ideal for low-frequency strategies, such as fetching daily closing prices, portfolio rebalancing, or checking account balances.
2. Streaming (WebSockets) Streaming is the “Push” method. Instead of repeatedly asking for data, your script performs a single “handshake” to open a persistent, two-way pipeline to the exchange.
- The Mechanics: Once the connection is established, the exchange’s server takes over. Whenever a market event occurs (e.g., a trade executes or the order book changes), the server instantly pushes a lightweight message down the pipe to your script.
- Pros: Ultra-low latency. Because the connection is already open, there is zero HTTP header overhead. Latency drops from hundreds of milliseconds down to single digits.
- Cons: Complex to implement. It requires asynchronous programming to listen to the continuous stream without freezing the rest of your trading logic.
- Use Case: Essential for High-Frequency Trading (HFT), Market Making, and live Order Book tracking.
14.4 Building a Live Polling Ticker (REST)
We will begin with the simpler architecture: Polling. Our objective is to build a script that fetches the live price of Bitcoin every 30 seconds and calculates the price change between ticks.
We will use the CoinGecko API. It is highly reliable, free, requires no API keys for basic usage, and provides live crypto data (some delay is imposed on free tiers, check their user guide).
The Implementation (Note: Ensure you have the requests library installed via pip install requests)
import requests
import time
import datetime
def get_bitcoin_price():
“””
Fetches the current price of Bitcoin from CoinGecko.
“””
# URL must be a standard string. Do not use hyperlink formatting.
url = “https://api.coingecko.com/api/v3/simple/price?ids=bitcoin&vs_currencies=usd”
try:
# requests.get() is a synchronous, blocking call
response = requests.get(url, timeout=5)
response.raise_for_status() # Raises an error for bad HTTP status codes
data = response.json()
price = data[‘bitcoin’][‘usd‘]
return price
except requests.exceptions.RequestException as e:
print(f“Network error fetching data: {e}”)
return None
except KeyError:
print(“Error parsing JSON response.”)
return None
# — The Main Event Loop —
if name == “main“:
print(“— Starting Live Bitcoin Ticker (Ctrl+C to Stop) —“)
print(f“{‘Time’:<12} {‘Price ($)’:<15} {‘Change’:<10}”)
print(“-“ * 40)
last_price = None
try:
# The while True loop is the heartbeat of a polling system
while True:
# 1. Fetch Data
current_price = get_bitcoin_price()
if current_price is not None:
# 2. Calculate State Change
if last_price is not None:
change = current_price – last_price
# Format with explicit positive/negative signs
sign = “+” if change >= 0 else “”
change_str = f“{sign}{change:.2f}”
else:
change_str = “0.00”
# 3. Display the Output
timestamp = datetime.datetime.now().strftime(“%H:%M:%S”)
print(f“{timestamp:<12} {current_price:<15,.2f} {change_str:<10}”)
# 4. Update State for the next iteration
last_price = current_price
# 5. The “Poll” Interval
# The script completely halts here for 30 seconds
time.sleep(30)
except KeyboardInterrupt:
print(“nTicker Stopped Gracefully.”)

Step-by-Step Breakdown:
- The Request Definition (get_bitcoin_price): We encapsulate the API call in a function. Notice the addition of timeout=5 and response.raise_for_status(). In live trading, an API might hang indefinitely. A timeout ensures our script crashes gracefully rather than freezing forever.
- The Event Loop (while True): This infinite loop keeps the script alive. It will run until the user explicitly sends an interrupt signal.
- State Management (last_price): We declare last_price outside the loop. This is critical. To calculate a delta (change), the script must “remember” the state of the previous iteration. At the end of every successful loop, we overwrite last_price with the current_price.
- The Blocking Sleep (time.sleep): The script pauses for 30 seconds to avoid spamming the CoinGecko API (which would result in our IP being banned). During this sleep, the Python interpreter does absolutely nothing.
This blocking nature is the exact limitation we will overcome in the next section when we introduce WebSockets.
14.5 Visualizing Live Data (matplotlib.animation)
Printing text to a console is functional, but humans process visual information much faster. To build a true Real-Time Dashboard, we need charts that dynamically update without freezing our data-fetching loop.
The matplotlib library contains an animation module perfectly suited for this. It redraws a plot at a specified interval, allowing us to see the “right edge” of the chart moving in real-time.
Note on Environments: Running live animations inside Jupyter Notebooks can be notoriously flaky due to how browsers handle rendering loops. This code is best executed as a standalone .py script.
The Implementation: A Live Ticker Tape
import matplotlib.pyplot as plt
from matplotlib.animation import FuncAnimation
import random # Used strictly for simulating a data feed in this example
# 1. State Setup
# We use lists to hold our time (x) and price (y) data.
x_data = []
y_data = []
# Initialize the plot figures
fig, ax = plt.subplots()
line, = ax.plot([], [], lw=2, color=‘blue’)
# Styling the Dashboard
ax.set_ylim(30, 70) # Set expected price range
ax.set_xlim(0, 50) # We will display exactly 50 “ticks” at a time
ax.grid(True, linestyle=‘–‘, alpha=0.6)
plt.title(“Live Market Feed (Simulated)”)
plt.xlabel(“Ticks”)
plt.ylabel(“Price ($)”)
def init():
“””Initializes the empty line for the animator.”””
line.set_data([], [])
return line,
def update(frame):
“””
This function is called repeatedly by FuncAnimation.
In a real system, you would fetch your live price here.
“””
# Simulate a new price tick arriving
current_price = random.randint(40, 60)
x_data.append(frame)
y_data.append(current_price)
# Memory Management: The Sliding Window
# If we append data forever, the script will eventually crash from out-of-memory errors.
# We explicitly drop the oldest data point to maintain a constant window size.
if len(x_data) > 50:
x_data.pop(0)
y_data.pop(0)
# Shift the X-axis forward to follow the data
ax.set_xlim(x_data[0], x_data[-1])
# Redraw the line with the updated data arrays
line.set_data(x_data, y_data)
return line,
# — Execution —
if name == “main“:
# interval=100 means the chart updates every 100 milliseconds (0.1s)
ani = FuncAnimation(
fig,
update,
frames=range(10000), # Run for 10,000 ticks
init_func=init,
blit=False,
interval=100
)
# plt.show() blocks the rest of the script while the window is open
plt.show()
14.6 Streaming with WebSockets: The Asynchronous Paradigm
In Section 14.4, we used Polling (asking “What is the price?” every 30 seconds). While stable, our script spent 99% of its time completely paralyzed during the time.sleep(30) phase.
WebSockets allow us to open a permanent, two-way pipe to the exchange. However, receiving a continuous stream of data introduces a massive structural problem: Standard Python is Synchronous.
If standard Python waits for a message from a WebSocket, it stops doing everything else. It cannot calculate indicators, it cannot update the matplotlib chart, and it cannot execute emergency risk-management rules. It just stares at the pipe, waiting.
To handle live streaming data efficiently, we must use Asynchronous Programming (asyncio).
The Kitchen Analogy (Sync vs. Async)
To truly understand how asyncio works, imagine a restaurant kitchen.
- Synchronous Python (The Novice Chef): This chef handles one task at a time. If a recipe requires boiling water for 10 minutes, the novice chef puts the pot on the stove and stands there, staring at the water for 10 minutes, doing absolutely nothing else. Only when it boils do they move on to chopping onions. This is highly inefficient.
- Asynchronous Python (The Head Chef): This chef uses an Event Loop. They put the water on the stove, set a timer, and immediately pivot to chopping onions. When a waiter hands them a new ticket (a WebSocket message arrives), they pause the onions, accept the ticket, and return to chopping. The Head Chef (the CPU) is never idle.
We write asynchronous code using two new keywords:
- async def: Declares a function as a “recipe” that can be paused and resumed.
- await: Tells the Event Loop, “I am waiting for something slow here (like network data). Pause this function and go do other work until the data arrives.”
14.7 A Simple WebSocket Client
We will use the websockets library to connect to the Binance public trade stream. It is exceptionally fast, highly robust, and requires no API keys for market data.
(Note: Ensure you have the library installed via pip install websockets)
The Implementation: Streaming Bitcoin Trades
import asyncio
import websockets
import json
import datetime
async def listen_to_market():
“””
Connects to the Binance WebSocket and streams live trades.
Notice the ‘async def’ – this function can be paused.
“””
# 1. The Endpoint
# Clean string URL. Do not use markdown/hyperlinks.
# url = “wss://stream.binance.com:9443/ws/btcusdt@trade“ (Outside US)
url = “wss://stream.binance.us:9443/ws/btcusdt@trade“
print(f“Connecting to {url}…”)
# 2. The Connection Handshake
# ‘async with’ ensures the connection is cleanly closed if the script crashes
async with websockets.connect(url) as websocket:
print(“Connected! Waiting for live trades…”)
print(“-“ * 50)
# 3. The Listen Loop
while True:
# 4. The Await Command
# This is where the magic happens. The script PAUSES here until a
# trade message arrives from Binance. Because we used ‘await’,
# the CPU is free to do other things in the background.
message = await websocket.recv()
# 5. Parse the JSON Payload
data = json.loads(message)
# Extract fields (Binance uses specific single-letter keys to save bandwidth)
price = float(data[‘p’])
qty = float(data[‘q’])
# Binance sends time in milliseconds, we convert it to a readable datetime
timestamp = datetime.datetime.fromtimestamp(data[‘T’] / 1000)
# ‘m’ indicates if the buyer was the market maker
is_buyer_maker = data[‘m’]
side = “SELL” if is_buyer_maker else “BUY”
# 6. Output formatting
print(f“[{timestamp.strftime(‘%H:%M:%S.%f‘)[:-3]}] {side:<5} {qty:>8.4f} BTC @ ${price:,.2f}”)
# — The Event Loop Entry Point —
if name == “main“:
try:
# asyncio.run() creates the Event Loop, runs our main async function,
# and cleanly shuts the loop down when finished.
asyncio.run(listen_to_market())
except KeyboardInterrupt:
print(“nStream Stopped Gracefully.”)

14.8 Managing State (The Order Book)
In the previous section, streaming trades was stateless; we simply printed the data as it arrived and forgot about it. However, quantitative trading is rarely stateless. You must maintain and continuously update a “local state” in your computer’s memory.
The ultimate test of state management is tracking an Order Book. An order book consists of two sides: Bids (Buyers) and Asks (Sellers).
There are two ways to track this:
- Level 2 (Full Depth): This is highly complex. You must download an initial Snapshot of the entire book, and then listen to a Delta stream, dynamically adding, updating, or deleting specific price levels in a local Python dictionary.
- Level 1 (Top of Book): This is simpler. The exchange continuously pushes only the absolute highest Bid and lowest Ask.
We will build a Level 1 tracker using Binance’s bookTicker stream. We will use Object-Oriented Programming (a Python class) to securely hold our state variables.
The Implementation: Tracking the Spread
import asyncio
import websockets
import json
class OrderBookTracker:
def __init__(self):
# 1. Initialize State
# These variables represent our “local memory” of the market
self.best_bid = 0.0
self.best_ask = 0.0
async def update_book(self):
# Clean URL string (No hyperlink formatting)
url = “wss://stream.binance.com:9443/ws/btcusdt@bookTicker“
async with websockets.connect(url) as ws:
print(“Connected. Tracking Real-Time Spread…”)
print(“-“ * 50)
while True:
msg = await ws.recv()
data = json.loads(msg)
# 2. Update State
# ‘b’ = best bid price, ‘a’ = best ask price
self.best_bid = float(data[‘b’])
self.best_ask = float(data[‘a’])
# 3. Perform Live Logic
spread = self.best_ask – self.best_bid
spread_pct = (spread / self.best_ask) * 100
# 4. Dynamic Console Output
# r returns the cursor to the start of the line, overwriting the previous output
# This creates a static, updating dashboard rather than a scrolling wall of text
print(f“rBid: ${self.best_bid:,.2f} | Ask: ${self.best_ask:,.2f} | Spread: ${spread:.2f} ({spread_pct:.4f}%)”, end=“”, flush=True)
# — Execution —
if name == “main“:
tracker = OrderBookTracker()
try:
asyncio.run(tracker.update_book())
except KeyboardInterrupt:
print(“nnTracker Stopped.”)

14.9 Handling Real-World Disconnections
If you run the OrderBookTracker long enough, it will eventually crash. Your ISP might flicker, Binance might reset a server, or a router might drop a packet. In a backtest, connectivity is 100%. In live trading, you must assume the network is actively trying to break your system.
The Heartbeat (Ping/Pong) To understand why connections drop, you must understand the “Heartbeat.” Exchanges monitor millions of WebSocket connections. To prune dead connections, the exchange periodically sends a hidden “Ping” frame to your script. Your script must immediately reply with a “Pong” frame.
The websockets library handles this Ping/Pong automatically in the background but only if the Event Loop is free. If you write time.sleep(10) inside your async loop, your script goes completely deaf. The exchange sends a Ping, your script fails to reply because it is sleeping, and the exchange forcibly terminates your connection. This is why you must always use await asyncio.sleep().
The Reconnection Pattern To survive disconnections, we wrap our connection logic in an outer while True loop with a robust try-except block.
import asyncio
import websockets
import json
async def robust_stream():
url = “wss://stream.binance.us:9443/ws/btcusdt@trade“
# The Outer Loop: Handles Reconnections
while True:
try:
print(“[SYSTEM] Attempting connection…”)
async with websockets.connect(url, ping_interval=20, ping_timeout=20) as ws:
print(“[SYSTEM] Connected. Streaming…”)
# The Inner Loop: Handles the Data Stream
while True:
msg = await ws.recv()
# Process your data here…
except websockets.exceptions.ConnectionClosed as e:
print(f“n[WARNING] Connection Lost! Reason: {e}”)
print(“[SYSTEM] Retrying in 5 seconds…”)
await asyncio.sleep(5) # Crucial: Non-blocking sleep
except Exception as e:
# Catch all other errors (like no internet access)
print(f“n[ERROR] Unexpected Error: {e}”)
print(“[SYSTEM] Retrying in 5 seconds…”)
await asyncio.sleep(5)
# — Execution —
if name == “main“:
try:
asyncio.run(robust_stream())
except KeyboardInterrupt:
# Note: In a live trading bot, this is where you would place your
# “Panic Button” logic (e.g., API calls to cancel all open orders).
print(“n[SYSTEM] Manual Override. Shutting down gracefully.”)
Pro-Tip: The Graceful Shutdown In the execution block above, notice the KeyboardInterrupt exception. If your script crashes or you manually stop it, you might be left holding unhedged positions. Professional quants use this except block as a “Panic Button” to trigger synchronous API calls that instantly cancel all open limit orders and submit market orders to flatten their exposure before the Python process entirely terminates.
14.10 The CCXT Library (The Universal Adapter)
One of the biggest architectural headaches in algorithmic crypto trading is Exchange Fragmentation. Traditional stock markets route orders through a centralized clearinghouse, but crypto exchanges operate in silos.
This creates a massive syntax problem for quantitative developers:
- Binance expects the ticker symbol “BTCUSDT”.
- Kraken expects “XXBTZUSD”.
- Coinbase expects “BTC-USD”.
If you write a highly profitable statistical arbitrage algorithm for Binance, the code is practically useless on Kraken without rewriting the entire API interface.
The Solution: CCXT CCXT (CryptoCurrency eXchange Trading Library) is an industry-standard, open-source library that unifies the APIs of over 100+ different exchanges into a single, standardized framework.
(Installation: pip install ccxt)
With CCXT, you learn one set of unified commands (e.g., fetch_ticker, create_order, fetch_balance), and the library translates them into the specific format required by each exchange. Furthermore, CCXT forces a standardized Base/Quote naming convention for all assets (e.g., ‘BTC/USDT’).
The Implementation: A Unified Price Check
import ccxt
# 1. Instantiate the Exchange Objects
# We are using the ‘public’ API, which requires no authentication keys.
binance = ccxt.binanceus()
kraken = ccxt.kraken()
print(f“Connected to: {binance.id} and {kraken.id}”)
# 2. Fetch Ticker using the Unified CCXT Symbol format
symbol = ‘BTC/USDT’
btc_binance = binance.fetch_ticker(symbol)
btc_kraken = kraken.fetch_ticker(symbol)
# 3. Analyze the Discrepancy (Arbitrage Spread)
price_binance = btc_binance[‘last’]
price_kraken = btc_kraken[‘last’]
spread = price_binance – price_kraken
print(“n— Market Check —“)
print(f“Binance: ${price_binance:,.2f}”)
print(f“Kraken: ${price_kraken:,.2f}”)
print(f“Spread: ${spread:,.2f}”)
14.11 Async CCXT (Concurrent Execution for Speed)
The code we wrote in 14.10 is Synchronous. It processes requests sequentially. If fetching a price takes 0.5 seconds, checking 3 exchanges takes 1.5 seconds total (0.5s + 0.5s + 0.5s). In the world of algorithmic trading, a 1.5-second delay guarantees you will miss the trade.
To achieve real-time speeds, we must execute these network requests Concurrently. We want to fire all 3 requests at the exact same time, reducing our total latency to the speed of the single slowest connection (just 0.5s total).
CCXT provides an asynchronous module precisely for this purpose: ccxt.async_support.
The Implementation: Parallel API Requests
import asyncio
import ccxt.async_support as ccxt_async # Import the async version
async def fetch_price(exchange_name, symbol):
“””
Dynamically initializes an exchange, fetches the price, and cleanly closes.
“””
# 1. Dynamic Instantiation
# getattr() allows us to convert the string ‘binance‘ into the ccxt_async.binance class
exchange_class = getattr(ccxt_async, exchange_name)
exchange = exchange_class()
try:
# 2. Await the Network Request
ticker = await exchange.fetch_ticker(symbol)
print(f“[{exchange_name.upper():<8}] ${ticker[‘last’]:,.2f}”)
except Exception as e:
print(f“[{exchange_name.upper():<8}] Error fetching data: {e}”)
finally:
# 3. Clean Memory Management
# Async connections MUST be explicitly closed to prevent memory leaks
await exchange.close()
async def main():
exchanges_to_scan = [‘binanceus‘, ‘kucoin‘, ‘kraken’]
symbol = ‘BTC/USDT’
print(f“— Firing Parallel Requests for {symbol} —“)
# 4. Create a list of ‘Tasks’
tasks = [fetch_price(name, symbol) for name in exchanges_to_scan]
# 5. Execute Concurrently
# asyncio.gather fires all tasks in the list simultaneously and
# waits for the last one to finish before proceeding.
await asyncio.gather(*tasks)
# — Execution —
if name == “main“:
asyncio.run(main())
14.12 System Defenses: Automatic Rate Limiting
When you build trading algorithms, your code can easily execute hundreds of loops per second. If you barrage an exchange’s API with thousands of requests, their servers will automatically block your IP address or suspend your API keys, returning an HTTP 429: Too Many Requests error.
Every exchange has a strict Rate Limit (e.g., Binance might allow 1200 “weights” per minute). Managing these limits manually, calculating exactly how many milliseconds to sleep between different types of calls, is a logistical nightmare.
One of the most powerful underlying features of CCXT is its Built-in Rate Limiter.
When enabled, CCXT tracks your network usage in the background. If your loop tries to send a request that would violate the exchange’s limits, CCXT automatically intercepts the request and applies the exact micro-pause (asyncio.sleep) required to keep your algorithm compliant and avoid a ban.
Implementation: You enable this feature by passing a configuration dictionary when instantiating the exchange object.
import ccxt.async_support as ccxt_async
# Enable Rate Limiting upon instantiation
exchange = ccxt_async.binance({
‘enableRateLimit‘: True, # <— The Defensive Shield
})
# In a live trading loop, you can now safely call the API
# without manually calculating time.sleep() intervals.
# The library will dynamically throttle your requests if you go too fast.
<br>
14.13 Mini-Project: The Real-Time Arbitrage Dashboard
Arbitrage is the act of buying an asset in one market and simultaneously selling it in another to capture a risk-free profit from the price discrepancy. In the highly fragmented cryptocurrency market, these momentary dislocations occur constantly.
The Objective: We will build a professional-grade, asynchronous console application that:
- Connects to Binance and Kraken concurrently using CCXT.
- Fetches the live BTC/USDT price every 2 seconds.
- Calculates the exact Profit Percentage (ROI).
- Flashes a visual TRADE SIGNAL if the potential profit exceeds our target threshold of 0.20%.
Step 1: The Architecture (State and Session Management) We will wrap our logic in an Object-Oriented class. In live systems, managing your network sessions is critical. If your script crashes without closing its open API connections, it can lead to memory leaks or locked ports on your machine.
(Note: Ensure your terminal supports standard ANSI color codes to see the visual trade alerts).
import asyncio
import ccxt.async_support as ccxt
import time
class ArbScanner:
def __init__(self, symbol=‘BTC/USDT’, threshold=0.20):
self.symbol = symbol
self.threshold = threshold
# 1. Initialize Exchanges with System Defenses
# We immediately apply the rate-limiting knowledge from Section 14.12
self.exchanges = {
‘binance‘: ccxt.binance({‘enableRateLimit‘: True}),
‘kraken’: ccxt.kraken({‘enableRateLimit‘: True}),
}
async def close_connections(self):
“””Cleanly closes network sessions to prevent memory leaks.”””
for exchange in self.exchanges.values():
await exchange.close()
async def fetch_price(self, name, exchange):
“””Fetches a single price safely with error handling.”””
try:
ticker = await exchange.fetch_ticker(self.symbol)
return name, ticker[‘last’]
except Exception as e:
# If one exchange drops a packet, we catch it here so the
# entire dashboard doesn’t crash.
return name, None
async def run(self):
print(f“— Starting Arbitrage Scanner: {self.symbol} —“)
print(f“Target Minimum Profit: > {self.threshold}%”)
print(f“{‘Time’:<10} {‘Binance’:<12} {‘Kraken’:<12} {‘Profit %’:<10} {‘Action’}”)
print(“-“ * 70)
try:
while True:
# 2. Concurrent Fetching (Speed is key)
tasks = [self.fetch_price(name, ex) for name, ex in self.exchanges.items()]
results = await asyncio.gather(*tasks)
# Convert list of tuples to a dictionary for easy access
prices = dict(results)
price_binance = prices.get(‘binance‘)
price_kraken = prices.get(‘kraken’)
# 3. Execution Logic: Only proceed if both legs returned valid data
if price_binance and price_kraken:
# Determine the optimal route
if price_binance < price_kraken:
buy_price, sell_price = price_binance, price_kraken
action = “BUY BINANCE -> SELL KRAKEN”
else:
buy_price, sell_price = price_kraken, price_binance
action = “BUY KRAKEN -> SELL BINANCE”
# Calculate True ROI based on capital deployed
profit_pct = ((sell_price – buy_price) / buy_price) * 100
# 4. Decision Engine & Visual Formatting
display_action = “WAIT”
if profit_pct > self.threshold:
# 33[92m = ANSI Green Text, 33[0m = Reset formatting
display_action = f“33[92m{action}33[0m”
# 5. Print Row
t_str = time.strftime(“%H:%M:%S”)
print(f“{t_str:<10} ${price_binance:<11.2f} ${price_kraken:<11.2f} {profit_pct:>7.3f}% {display_action}”)
# 6. The Heartbeat Wait
await asyncio.sleep(2)
except KeyboardInterrupt:
print(“n[SYSTEM] Manual Interruption. Stopping Scanner…”)
finally:
# Always execute the cleanup function
await self.close_connections()
# — Execution Entry Point —
if name == “main“:
# We use a low threshold (0.10%) just to generate demo signals on a live market
scanner = ArbScanner(symbol=‘BTC/USDT’, threshold=0.10)
asyncio.run(scanner.run())
Step 2: Interpreting the Output When executing this script, you will see a continuous stream of market data. Because we structured our asynchronous calls properly, both prices represent the exact same millisecond in time.
Real-World Nuance: The Illusion of Profit Before you connect this scanner to a live order-execution function, you must understand Fees and Slippage.
In the real world, an exchange charges a Maker/Taker fee (often 0.10% per trade). Since arbitrage requires two trades (one buy, one sell), your total fee overhead is 0.20%. If your scanner detects a 0.15% spread, executing the trade will result in a guaranteed net loss. A true algorithm must dynamically deduct exchange fees from the profit_pct before generating a signal.
<br>
14.14 Chapter Summary
In this final chapter, we successfully crossed the “hard right edge” of the chart. We transitioned from backtesting against static, historical files to interacting with the live, unpredictable flow of the present market.
Applying live execution code without understanding the underlying network architecture is an invitation to disaster. Here are the core structural concepts you must take with you:
- The Architecture Shift: We learned that professional trading systems cannot rely on slow, blocking code. We must use Asynchronous Programming (asyncio) to handle multiple data streams concurrently, ensuring our “Head Chef” (the CPU) is never left waiting idly for network responses.
- Connectivity Paradigms:
- Polling (REST): Useful for low-frequency checks and portfolio snapshots.
- Streaming (WebSockets): The mandatory, low-latency “push” technology required for tracking fast-moving Level 1 Order Books and trade feeds.
- The Universal Adapter: We introduced CCXT, a powerful library that solves the nightmare of exchange fragmentation. It allows us to standardize our logic across Binance, Kraken, and hundreds of other exchanges using a single, unified syntax.
- System Resilience: Live networks fail. We learned to design robust systems using try/except blocks, while True reconnection loops, and automated Rate Limiting to defend our algorithms against disconnections and API bans.
<br>
14.15 Review Questions
1. The Speed of Async You have written a function fetch_price() that takes exactly 1.0 second to reach an exchange and return data. If you need to fetch prices from 10 different exchanges, how long will it take using a standard for loop versus using asyncio.gather?
- Answer:
- Standard (Synchronous): ~10 seconds. The loop runs sequentially (1s + 1s + 1s…).
- Async (Concurrent): ~1 second. asyncio.gather fires all 10 requests at the exact same time, so the total delay is simply the speed of the single slowest response.
2. State Corruption (Order Book Dynamics) You are streaming a Full Order Book (Level 2) via WebSockets. Due to a momentary lag spike, your computer misses a single update packet from the exchange. What happens to your local Python dictionary holding the bids and asks?
- Answer: Your local memory becomes entirely corrupted. Because you missed a delta (a change), your local state no longer matches the exchange’s true state. To fix this, your code must immediately disconnect, fetch a fresh “Snapshot” via a REST API, and restart the WebSocket stream to re-sync.
3. The Reality of Arbitrage Your asynchronous scanner finds a lucrative 1.0% spread between Binance and Kraken. However, due to slow API execution routing, it takes you 2 seconds to actually place both trades. What is the primary risk here?
- Answer: Execution Risk (Slippage). In the crypto markets, 2 seconds is an eternity. During that delay, the price might move, or another algorithmic trader might consume the available liquidity. You risk getting “legged” into the trade—successfully buying on one exchange but failing to sell on the other, leaving you with unhedged, directional exposure.
<br>
14.16 Final Conclusion: The Quant’s Journey
Congratulations! You have officially completed Python for Quantitative Finance.
Take a moment to look back at the toolkit you have built. We started with the absolute basics of variables and syntax. We mastered the vector mathematics of NumPy, manipulated massive datasets with Pandas, and visualized the invisible with Matplotlib.
We then stepped into the statistical nature of the markets: analyzing distributions, forecasting volatility with GARCH, and measuring risk with VaR. We optimized capital allocation using Modern Portfolio Theory, rigorously simulated our theories with Backtrader, and finally, built the asynchronous pipelines necessary to execute those theories in the live market.
The tools and concepts covered in these pages are the exact same ones utilized by professional quantitative researchers and financial engineers at the highest levels of the industry.
Where do you go from here? The learning never truly stops. As you continue your journey, consider exploring these advanced frontiers:
- Infrastructure: Learn cloud deployment (AWS, GCP, or Docker) to host your algorithms on dedicated servers, allowing them to run 24/7 with minimal latency.
- Advanced Mathematics: Dive into Stochastic Calculus to build pricing engines for complex exotic derivatives.
- Machine Learning: Explore how Deep Neural Networks and Reinforcement Learning are being used to train automated trading agents that adapt to shifting market regimes.
You now have the foundation to not only survive the complexity of modern financial markets but to thrive in them. The only limit now is your own creativity in finding the signal hidden within the noise.
Happy Trading.